Stippling With Acrylic Paint: Dots, Foliage and Soft Texture
Stippling builds foliage, blossom and speckled texture from dabbed dots. See which brushes work, the dark-to-light method, a three-stage bush exercise and how to keep the pattern from turning mushy.

At a glance
Brushes and materials
- Old splayed round brush or small stencil-style brush
- Piece of torn sponge (optional)
- Palette and water jar
- Paper towels
Leaves, blossom and moss are made of hundreds of small separate things, and trying to paint them with strokes usually produces a flat green shape with a hard outline. Stippling with acrylic paint takes a different route: you dab instead of stroke, and let clusters of small marks suggest the mass.
The technique is simple, needs no special brush, and suits acrylic well because each set of dabs dries quickly enough for the next set to sit cleanly on top.
What stippling is
Stippling means tapping paint onto the surface with the tips of the bristles while the brush is held upright, at a right angle to the painting. The brush goes straight down and straight up. There is no sideways movement at all.
Each tap leaves a small cluster of dots rather than a solid mark. Overlap enough of them and you get a soft, broken texture with tiny gaps where the layer underneath shows through.
Brushes and tools that work
- An old, splayed round brush. The spread bristles make irregular dot clusters, which is exactly what foliage needs.
- A stiff flat held on end. Tap with one corner or with the whole flat tip for a blockier mark.
- A small stencil-style brush. Short, dense bristles cut flat give an even, round dab.
- A piece of sponge. Torn rather than cut, so the edge is ragged. Good for covering large areas of foliage quickly.
Soft, pointed brushes in good condition are the wrong choice here. Tapping bends the tip and wears it out. If you are unsure which of your brushes to sacrifice, the overview of acrylic brush shapes will help you sort them.
The basic stippling method
- Use little paint. Put out creamy paint with no added water, and touch just the bristle tips into it.
- Tap off the excess. Dab the brush two or three times on a paper towel or a clean part of the palette until the marks separate into dots.
- Dab in overlapping clusters. Work in small groups of taps, turning the brush slightly between them so the pattern does not repeat.
- Go from dark to light. Stipple the darkest value first, then the middle value, then the lightest, letting each one dry for a few minutes.
- Leave gaps. Do not cover the previous layer completely. The darker dots showing between the lighter ones create the depth.
Tip
Rinse the brush between values, then squeeze it nearly dry in a paper towel. A wet brush makes the dots run together into blots.
Practice exercise: a stippled bush
Work on acrylic paper or a small canvas panel, about 6 x 8 in (15 x 20 cm), with sap green, ultramarine blue, primary yellow and titanium white. Imagine the light coming from the upper left.
- Dark dabs. Mix sap green with a touch of ultramarine. Stipple a loose, rounded bush shape, keeping the dabs sparse and the outline uneven, with a few stray dots beyond the edge. Let it dry for roughly 10 minutes.
- Medium dabs. Use sap green on its own, or with a touch of yellow. Stipple over most of the bush, leaving the dark showing along the bottom and the right side and in scattered gaps.
- Light dabs. Mix sap green with more yellow and a little white for a light yellow-green. Stipple only the upper left side in a few clusters, where the light would land.

If the bush turns into one solid green, the paint was too wet or you covered too much. Let it dry, stipple a few dark dabs back into the shadow side, and restate the lights more sparingly.
Where to use stippling
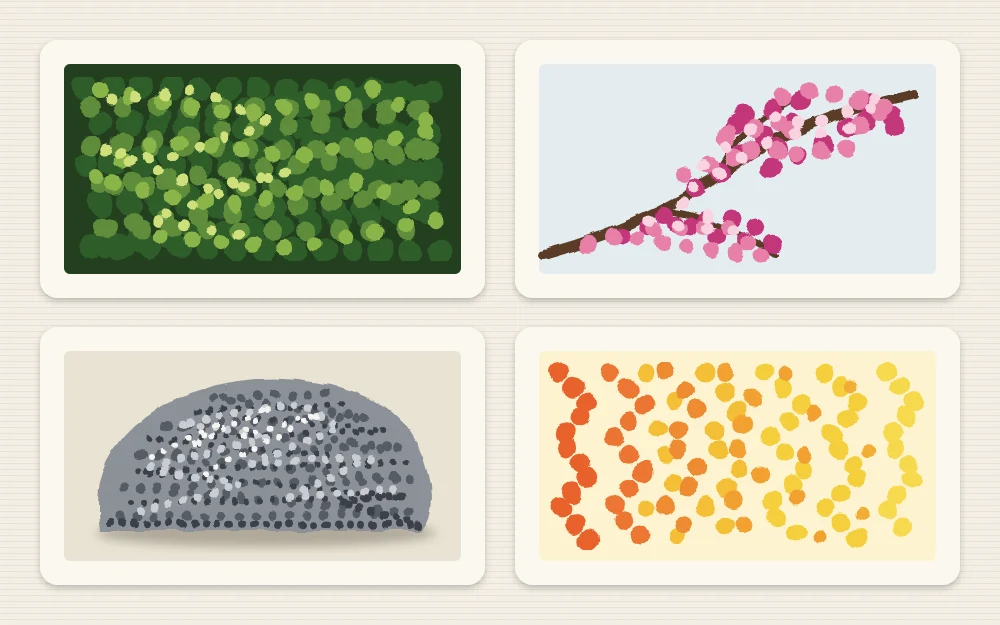
- Tree foliage and bushes. The classic use. The step-by-step guide to painting trees in acrylic builds whole crowns this way.
- Flower clusters. Dabs of pink or white over dark branches read as blossom from a distance. A fingertip-sized cluster of yellow dots also makes a convincing flower center, as in the easy acrylic daisies tutorial.
- Speckled texture. Light and dark gray dabs over a mid-gray shape suggest stone, gravel or sand.
- Soft gradients made of dots. Stipple one color densely at one end and thin it out toward the other, then do the reverse with a second color so the two interlock, such as orange fading into yellow.
How to avoid a mushy, even pattern
Stippling fails in two opposite ways. Either the dots merge into a paste, or they stay separate but so regular that the result looks like a printed pattern. Both have simple causes.
- Too much paint or water. Dots flood together. Tap off more before you start and keep the brush barely damp.
- Not waiting between values. Light dabs into wet dark paint mix to a single middle green. Give each layer a few minutes.
- Covering everything. If every part of the shape gets all three values, the contrast disappears. Keep the lights to a third of the area or less.
- A steady rhythm. Tapping at one speed, pressure and spacing makes rows. Turn the brush, vary the pressure, and cluster the dabs with open spaces between groups.
- A neat outline. Foliage has a ragged edge. Let some dabs wander outside the shape and leave a few holes where the background shows through.
Clean up before the paint sets
Tapping pushes paint deep into the bristles, toward the ferrule. Wipe the brush on a paper towel first so less paint goes down the drain, then wash it with water, working the base of the bristles between your fingers. Paint dried in a brush is very hard to remove, and a stippling brush hides more of it than you expect.
Frequently asked questions
What is the best brush for stippling?
A worn round brush with bristles that have spread apart is hard to beat for foliage, because it makes irregular clusters. A short, flat-cut stencil-style brush gives rounder, more even dabs. Avoid good pointed brushes, since repeated tapping bends and frays the tip.
Should the paint be thick or thin for stippling?
Keep it creamy and undiluted. Thinned paint spreads when it touches the surface, so the dots join into blots. Load only the bristle tips, tap the excess onto a paper towel, and reload often with small amounts instead of taking a large amount at once.
Can I stipple with a sponge instead of a brush?
Yes. A small piece torn from a sponge gives a ragged, open texture that covers large areas of foliage fast. Dampen it, squeeze it out well, pick up a little paint and test on scrap paper first. Use a brush afterward for the smaller light clusters.