How to Paint Trees in Acrylic: Trunks, Foliage and Distance
Replace lollipop trees with three believable types: a leafy tree with stippled foliage clusters, a pine with zigzag boughs and soft distant trees. Covers tapering trunks, one light direction and grounding shadows.

At a glance
Brushes and materials
- Liner brush
- Small round brush
- Old round or stiff brush for stippling
- 1/2 in flat brush or fan brush
- Medium filbert brush
- Palette and two water jars
- Paper towels
The lollipop tree, a green ball on a brown stick, appears in nearly every first landscape. It happens because you paint the idea of a tree instead of its structure. Learning how to paint trees in acrylic is mostly a matter of replacing that symbol with three simple observations: trunks taper, foliage grows in clumps with gaps, and light comes from one side.
Below are three tree types that cover most beginner landscapes: a leafy tree, a pine and a line of distant trees. Practice each on acrylic paper or a spare panel over a dry, pale sky color.
What you need
- Colors: titanium white, ultramarine blue, primary yellow, sap green, burnt sienna and burnt umber.
- Brushes: a liner, a small round, an old round or small stiff brush for stippling, a 1/2 in (12 mm) flat or a fan brush, and a medium filbert.
- Also: a palette, two water jars and paper towels.
Mix three greens before you begin and keep them separate:
- Dark: sap green with ultramarine and a touch of burnt sienna.
- Mid: sap green with a little primary yellow.
- Light: the mid green with more yellow and a little white.
Four habits that cure lollipop trees
- Pick a light direction and keep it. In these examples the light comes from the upper left, so lights go on the upper left of every tree and darks on the lower right.
- Taper everything. A trunk is widest at the ground and narrows as it rises. Each branch is thinner than the one it grows from.
- Break the outline. A real tree has an uneven edge, with bumps, dips and holes where the sky shows through.
- Ground it. A tree with no shadow floats. A short, dark, horizontal patch at its base attaches it to the land.
A leafy tree in three stages
- Trunk and branches. Mix burnt umber with a little ultramarine and thin it with water until it flows. With the small round, paint the trunk from the ground upward, easing off the pressure so it narrows. About halfway up, split it into two or three main branches in a Y shape. Switch to the liner and pull a few thinner branches outward and upward, each ending in a fine point. Let it dry.
- Dark foliage clusters. Load the stippling brush with dark green, tap off the excess on a paper towel, and dab five to seven clumps of different sizes over the branches. Leave gaps between them, and let parts of the branches show. Keep the overall outline irregular and wider than it is tall.
- Mid and light clusters. While the darks are tacky or dry, tap mid green over the upper left portion of each clump, leaving dark showing beneath and to the right. Then tap a small amount of light green on the very top left of only the clumps that face the light.
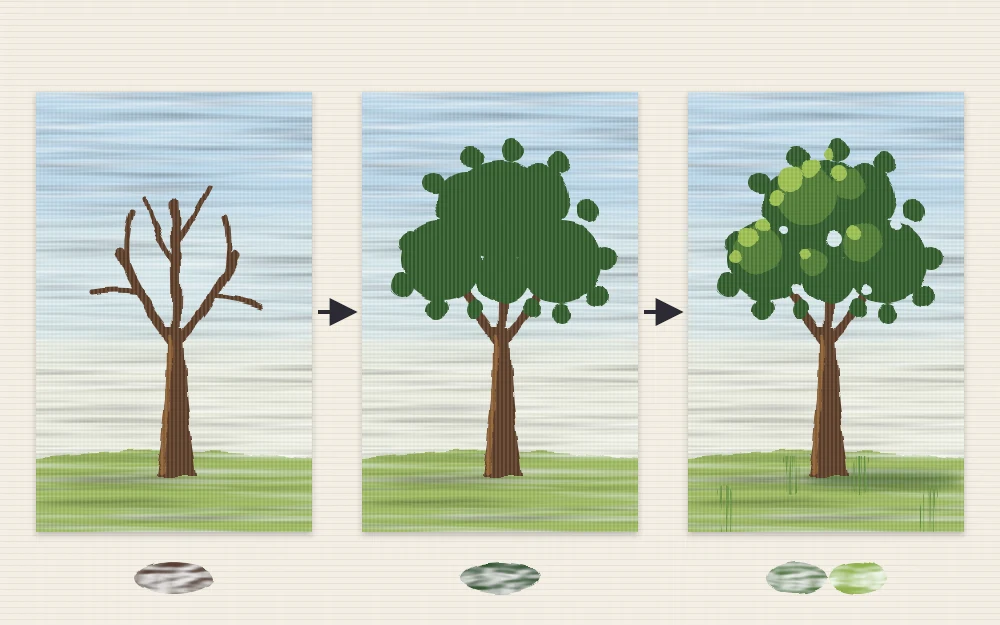
If the foliage closes up into a solid mass, wait for it to dry and dab a few small spots of sky color back in, mostly near the edges and around the branches. Then draw a short length of branch across one or two of those gaps with the liner.
The dabbing motion itself, including how much paint to carry and how to avoid a regular pattern, is covered in the guide to stippling with acrylic paint.
Tip
Use roughly three times as much dark as light. Beginners usually cover the whole tree with highlight, which flattens it again.
A pine in three stages
- Trunk line. With the liner and the thinned dark brown, pull one thin vertical line. Let it lean very slightly; a perfectly straight, perfectly centered line looks mechanical.
- Zigzag boughs. Load just the corner of the flat brush with dark green. Starting at the top with a tiny vertical dab for the tip, tap short strokes left and right of the trunk in a loose zigzag, making each pair a little wider than the one above. Angle the strokes slightly downward and outward. Leave small gaps so the trunk shows in places. With a fan brush, hold it horizontally and tap with one corner or the flat end for the same effect.
- Light and shadow. Tap mid green, then a little light green, on the left-hand boughs only. Finish with a short horizontal dab of dark green on the ground at the base, extending to the right.
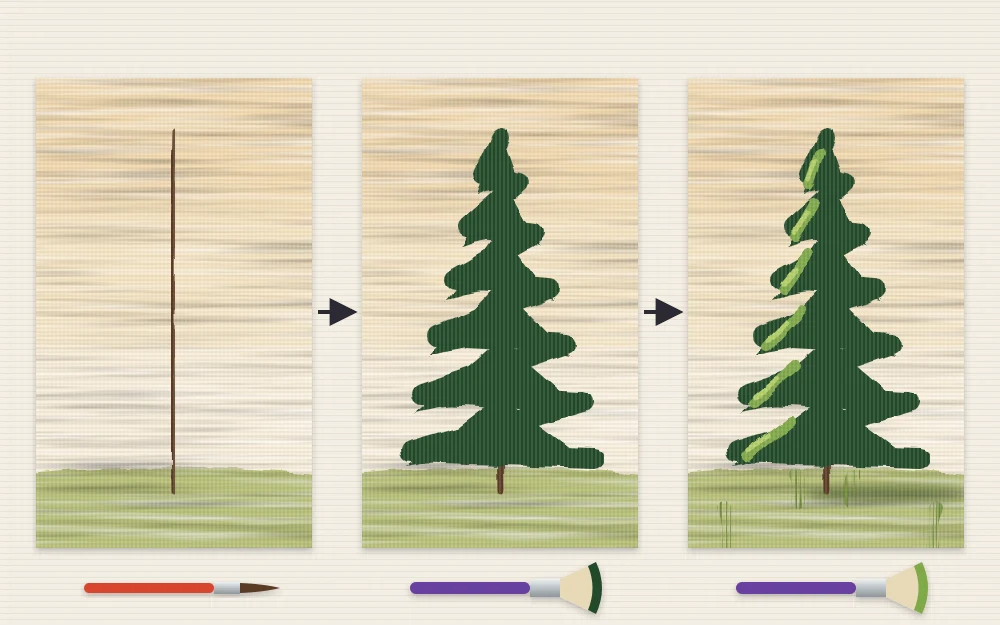
The usual fault is a neat triangle with matching sides. Make one side fuller and let a bough or two stick out.
Distant trees with no detail
Far-off trees are shapes, not objects. Paint them before the nearer trees so the foreground overlaps them.
- Mix a soft blue-green: the mid green with ultramarine and plenty of white. It should be only a little darker than the sky.
- Paint a low, bumpy band along the horizon with the filbert, varying the height of the bumps. A few slightly taller, pointed shapes suggest pines among rounder trees.
- Soften the top edge by dragging a nearly dry brush lightly over it. This dry brush technique leaves a broken, feathery edge that reads as foliage at a distance.
Add no trunks, no highlights and no dark shadows. The moment you add detail, the trees jump forward.
Grouping trees and varying heights
- Use odd numbers. Three or five trees group more naturally than two or four.
- Vary the heights. Make one tree clearly the tallest, one mid-sized and one small. Avoid a steady staircase from short to tall.
- Overlap. Let one tree partly cover another, and paint the one behind slightly lighter and bluer.
- Stagger the bases. Trees standing on one straight line look planted in a row. Set nearer trees a little lower on the canvas.
To put these trees to work in a complete scene, the five-layer landscape tutorial places a small group against hills and a field.
Fixing common problems
- Foliage looks like polka dots: the dabs are too separate and too even. Join some into larger clumps and vary the pressure.
- Trunk looks like a pole: widen it at the base with a small flare where it meets the ground, and thin it toward the top.
- Greens look artificial: add a touch of burnt sienna to calm them.
Frequently asked questions
What brush is best for painting trees in acrylic?
No single brush does everything. A liner handles thin trunks and branches, an old round or stiff brush stipples leafy foliage, and the corner of a flat or a fan brush taps in pine boughs. A worn brush with splayed hairs often gives the most natural leaf texture.
How do I mix a natural green for trees?
Start with sap green and adjust it. Ultramarine and a touch of burnt sienna give a deep shadow green, a little yellow gives a mid green, and more yellow with a small amount of white gives a highlight. A trace of a red-brown calms any green that looks too bright.
Why do my trees look flat?
Usually the foliage is one green all over, or the highlights cover the whole tree. Keep most of each clump dark, add mid green only toward the light, and save the lightest green for a few top edges. Small sky gaps and a ground shadow also add depth.