Simple Acrylic Landscape: Hills, Trees and Sky in Five Layers
Build a first landscape back to front in five layers: sky, far hills, middle hills, a foreground field and a group of trees. Learn how lighter, bluer distance and darker, warmer foreground create depth.
At a glance
Brushes and materials
- 1 in flat brush
- Medium filbert brush
- Small round brush
- Old stiff brush for dry brush grass
- Pencil
- Palette and two water jars
- Paper towels
A first landscape feels like a lot to manage: sky, hills, fields and trees, all at once. It becomes manageable when you paint it the way you see it, from the farthest thing to the nearest, one dry layer at a time.
This simple acrylic landscape is built in five layers. Along the way you will use the one idea that makes any landscape look deep instead of flat: distant things are lighter, bluer and softer, and near things are darker, warmer and more detailed.
What you need
Use a canvas panel of about 9 x 12 in (23 x 30 cm), turned sideways.
- Colors: titanium white, ultramarine blue, primary yellow, yellow ochre, sap green and burnt sienna.
- Brushes: a 1 in (2.5 cm) flat, a medium filbert, a small round and an old, stiff brush for grass.
- Also: a palette, two water jars, paper towels and a pencil.
Plan the scene before you paint
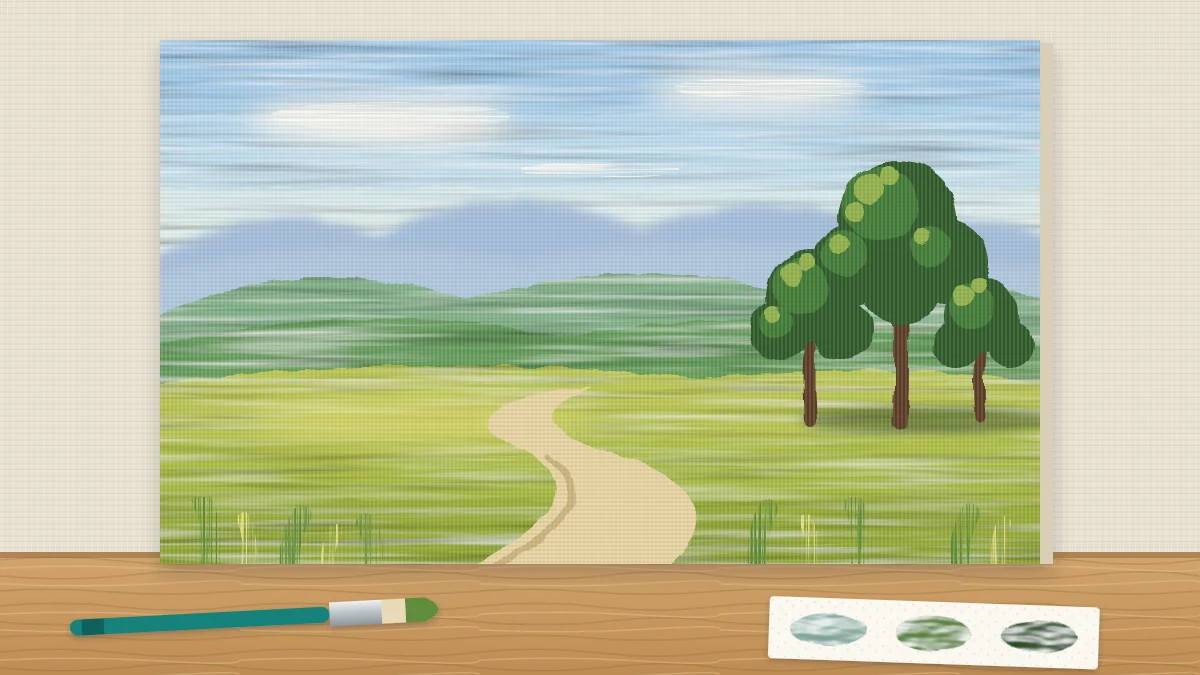
The scene is your own invention: a sky, a line of distant hills, a closer range of hills, a foreground field with a path, and a small group of trees on the right. Sketch it lightly in pencil with only four or five lines.
- Keep the horizon off center. A horizon across the exact middle cuts the picture in two equal halves. Place the top of the far hills about one third of the way up from the bottom for a big sky, or one third down from the top if you want more land.
- Overlap the hills. Each range should partly cover the one behind it. Overlap is the simplest depth cue there is.
- Add a lead-in. Draw a path or a stream that starts wide at the bottom edge and narrows in an S-curve as it winds toward the hills. It gives the eye a way into the picture.
- Place the trees to one side, about a third of the way in from the right edge, not in the middle.
How distance changes color
Air is not perfectly clear. The more of it there is between you and a hill, the paler and bluer that hill appears, and the less detail you can see. This effect is called atmospheric perspective, and you can paint it with three decisions per layer: value, color temperature and edge.

| Layer | Value | Color | Edges and detail |
|---|---|---|---|
| Far hills | Light | Blue | Soft, none |
| Middle hills | Medium | Blue-green | Fairly soft, very little |
| Foreground | Darker accents | Warm yellow-green | Crisp, most detail |
Mix three greens
All three start from sap green, so they belong together. Mix a generous amount of each.
- Soft blue-green for the middle hills: sap green with ultramarine and enough white to make it clearly lighter than the foreground.
- Warm yellow-green for the field: sap green with primary yellow and a little yellow ochre.
- Dark warm green for the trees and foreground shadows: sap green with ultramarine and a touch of burnt sienna. No white.
The far hills are not green at all. Mix them from white and ultramarine with only a trace of the blue-green.
Paint the five layers, back to front

Let each layer become touch-dry before starting the next, roughly 10 to 20 minutes. Painting a new shape over a dry one keeps its edge clean, as explained in the guide to layering acrylic paint.
- Sky. With the flat brush, paint a pale blue sky that is slightly deeper at the top and nearly white at the bottom. Carry it down past the pencil line of the far hills. For gradients and clouds in detail, see the tutorial on painting a sky in acrylic.
- Far hills. Using the filbert and the pale blue hill mix, paint a low, gently rolling shape. It should be only a step darker than the sky above it. Soften the top edge with a damp brush before it dries.
- Middle hills. Paint the next range in the soft blue-green, overlapping the bottom of the far hills. Give it a different outline, higher on one side. Leave the edge a little firmer.
- Foreground field. Fill the lower part with the warm yellow-green, using broad strokes that follow the slope of the ground. Paint the path in white with yellow ochre and a touch of burnt sienna, wide at the bottom and thinner as it recedes. Darken the field slightly toward the bottom corners.
- Trees and details. With the dark warm green, dab in three trees of different heights on the right, their bases overlapping the field and their tops rising above the middle hills. Add a few lighter touches of yellow-green on the side facing the light. Step-by-step foliage and trunks are covered in the guide to painting trees in acrylic.
Tip
Before each new layer, hold the loaded brush next to the layer behind it. If the two look the same in value, darken the new mix. Each step forward should be visibly darker.
Final touches with dry brush grass
Detail belongs in the foreground only. Pick up a little dark warm green on the old, stiff brush, wipe most of it off on a paper towel, and flick short upward strokes along the bottom edge and beside the path. Repeat with the yellow-green, then with yellow-green and white for a few lit blades.
- Make the grass strokes tallest at the bottom edge and shorter farther back, fading to nothing by the middle of the field.
- Add a soft, dark shadow on the ground beside the trees, on the side away from the light.
- Put two or three darker flecks along the edges of the path to settle it into the field.
Then stop. Grass on the distant hills would pull them forward and undo the depth you have built.
If the depth is not working
- Far hills look too close: they are too dark or too green. Mix some sky color with a touch more white and glaze or repaint them.
- Everything looks the same green: push the layers apart. Add blue and white to the middle hills, and yellow ochre to the field.
- The picture feels flat at the front: the foreground lacks a dark. Deepen the trees and their shadow with more of the dark warm green.
- A hill has a hard, cut-out edge: dry brush a little of the color behind it over the edge to soften it.
Frequently asked questions
Where should the horizon go in a landscape painting?
Avoid the exact middle, which splits the picture into two equal halves. Placing the horizon about a third of the way up gives a broad sky, while a third of the way down from the top gives more room for land. Choose whichever part interests you most.
How do I make hills look far away in acrylic?
Paint distant hills lighter, bluer and softer than anything in front of them. Mix them mostly from white and blue with almost no green, keep them just a step darker than the sky, and leave out all detail. Each nearer range then gets darker and warmer.
Do I have to wait for each layer to dry?
For this method, yes. A thin layer is usually touch-dry in roughly 10 to 20 minutes, and painting the next shape over a dry one keeps its edge and color clean. If you paint into a wet layer, the colors merge and the hills lose their separation.