Acrylic Paint Brushes: Shapes, Sizes and What Each One Does
A clear guide to brush shapes and the marks they make, how size numbers and handle lengths work, and which three brushes to own first before adding any others.
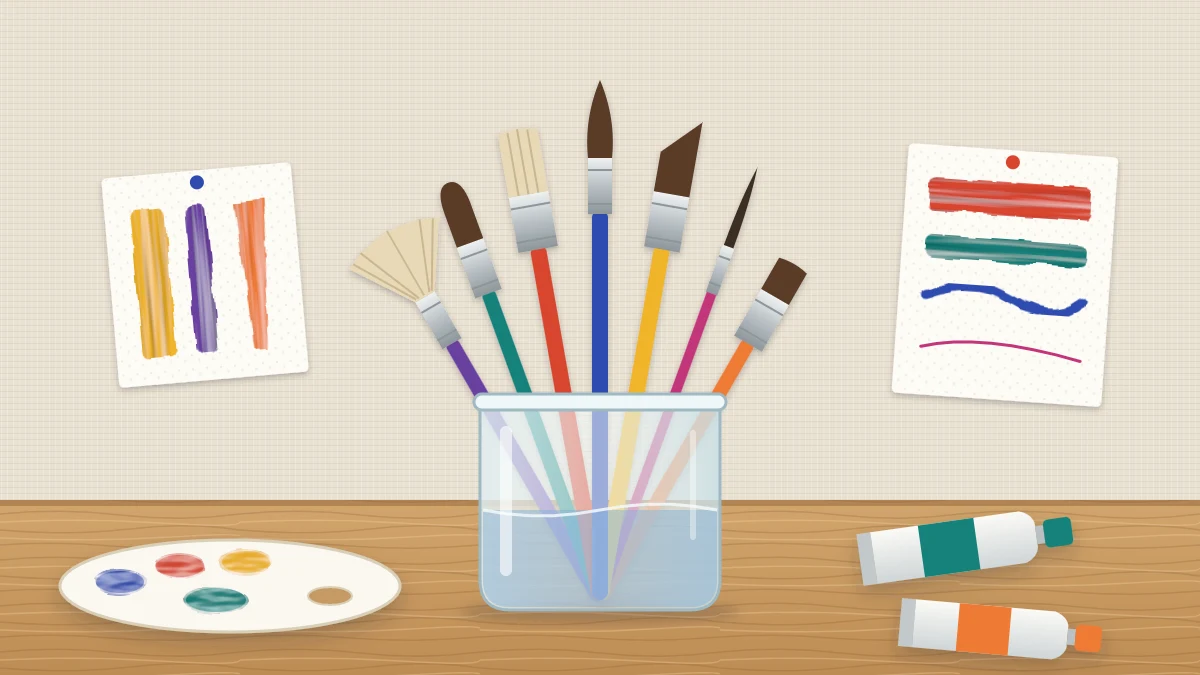
A wall of brushes in a dozen shapes, each with a different number on the handle, is enough to make anyone grab a random multipack and hope. Acrylic paint brushes are simpler than they look: a few shapes do nearly all the work, and the numbers matter less than the width of the tip.
Here is what each shape is for, how sizes and handles work, and which three brushes are worth owning first.
Why synthetic bristles suit acrylics
Brush hairs are either natural or synthetic. For acrylics, synthetic is the practical choice. The fibers stand up to long contact with water, keep their spring when loaded with thick paint and tolerate the frequent washing acrylics demand.
Synthetic brushes come in two broad feels. Soft synthetics leave smooth strokes and suit fluid paint, blending and detail. Stiff synthetics push thick paint around and leave visible bristle marks, which is useful for texture. A beginner set that leans soft-to-medium covers most needs.
The parts of a brush
- Bristles (also called the hair or tuft): the working end. The very end is the tip; the widest part of a round is the belly.
- Ferrule: the metal band that grips the bristles and joins them to the handle. Paint that dries inside it pushes the bristles apart for good.
- Handle: usually wood or plastic, short or long.
Knowing the ferrule matters for one habit: load paint only about halfway up the bristles, and keep it out of the metal.
Brush shapes and the marks they make
Flat
A square tip with medium-length bristles. Used on its broad face it lays a wide, even band; turned on its edge it draws a thin line. Flats are the workhorse for backgrounds, skies and blocking in.
Bright
A flat with shorter bristles. The short tuft is stiffer and gives more control, so it suits short, firm strokes and thick paint.
Round
A round body tapering to a point. Light pressure gives a thin line and more pressure a wider one, so a single stroke can swell and taper. Good for lines, stems, outlines and small shapes.
Filbert
A flat brush with a rounded, oval tip. It makes soft-ended strokes with no hard corners, which is ideal for petals, leaves, clouds and blending one area into another.
Angle
A flat cut on a slant. The long point reaches into corners and the slanted edge follows curves neatly, making it a favorite for sharp edges and shaped strokes.
Fan
Bristles spread in a thin fan. Tapped or flicked, it leaves feathery, broken marks for grass, pine boughs and foliage texture. It also softens a blend when swept lightly over wet paint.
Liner
A very thin round with long hairs, sometimes called a rigger or script brush. Loaded with fluid paint it draws long, fine, unbroken lines: branches, grasses, whiskers of light on water.
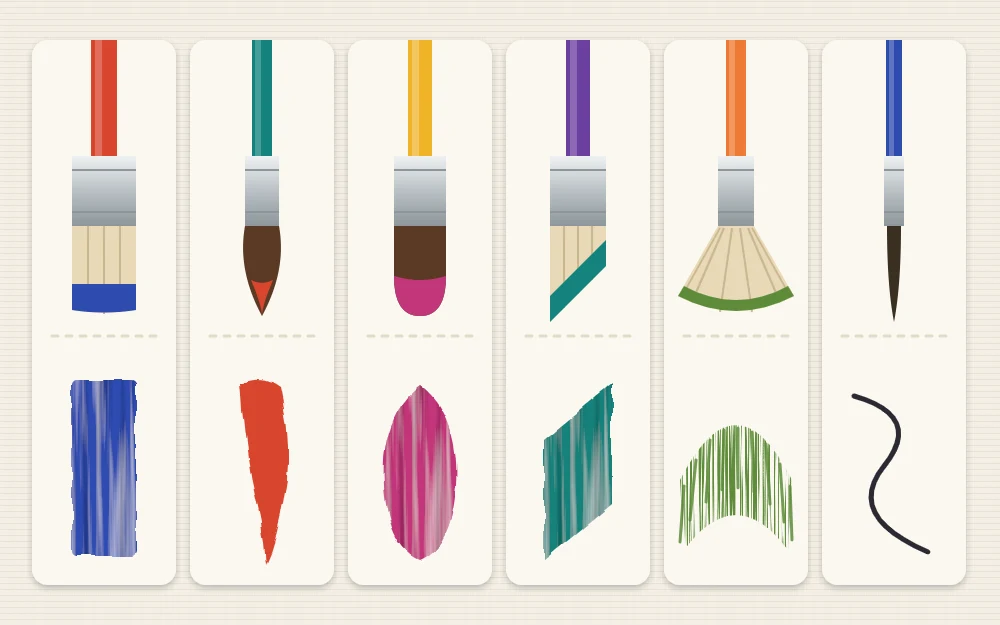
Shapes at a glance
| Shape | Mark | Best use |
|---|---|---|
| Flat | Wide even band; thin line on its edge | Backgrounds, skies, blocking in |
| Bright | Short, firm, square stroke | Thick paint, controlled dabs |
| Round | Line that swells and tapers | Lines, stems, small shapes |
| Filbert | Soft, rounded stroke | Petals, leaves, clouds, blending |
| Angle | Slanted stroke with a sharp point | Clean edges, corners, curves |
| Fan | Feathery broken arc | Grass, pine boughs, texture |
| Liner | Long hair-thin line | Branches, fine details |
How size numbers work
Brushes carry a number on the handle, and within one maker’s range a higher number means a bigger brush. Very small brushes may be marked 0, or 2/0 and 3/0 for smaller still. Large flats are often labeled by width in inches instead.
The catch is that numbers are not standardized. A size 8 round from one maker can be noticeably larger than a size 8 from another, and a size 8 flat is a different width again.
So judge by the actual width of the tip. As a rough guide for small paintings:
- Large: about 3/4 to 1 in (2 to 2.5 cm) wide, for backgrounds
- Medium: about 1/4 to 1/2 in (6 to 12 mm), for main shapes
- Small: under about 1/8 in (3 mm), for details
Short handles or long handles
Short handles are made for working close, at a table, with the hand near the surface. They are the comfortable choice for small paintings and detailed work.
Long handles are designed for standing at an easel. Holding the brush near the end keeps you back from the canvas and encourages looser strokes from the arm.
If you paint seated at a table on small panels or paper, short handles are easier to manage. Either type makes the same marks.
A sensible first three
- A 1 in (2.5 cm) flat for covering large areas quickly.
- A medium filbert or round for most of the actual painting.
- A small round for details and thin lines.
These three will carry you through most beginner subjects. They are also the brushes listed in the simple starter kit of supplies, alongside paint and surfaces.
The fastest way to learn what each brush can do is to try every mark it makes: face, edge, corner and tip, with light and heavy pressure. The brush control drills turn that into a short routine.
What to add later
- An angle brush, when you want crisper edges.
- A liner, when you start painting branches, grasses or fine stems.
- A fan brush, for landscapes with pines and grass.
- A second, smaller flat, for mid-sized shapes and straight edges.
- An old stiff brush kept aside for dry brush and stippling, which are hard on bristles.
Add one at a time, when a painting calls for it.
Tip
Before buying, press the tip gently against your palm. A good synthetic brush springs back to its shape, has no stray hairs sticking out and has a ferrule that does not wiggle on the handle.
Making brushes last
Acrylic is hard on brushes for one reason: paint dried in the bristles is very hard to remove. A few habits prevent most damage.
- Never let paint dry on a brush; rinse it or lay it flat and damp.
- Do not leave brushes standing on their tips in the water jar.
- Wipe excess paint onto a rag before rinsing.
- Wash with mild soap after each session and reshape the tip.
The full routine is in the guide to cleaning acrylic brushes and making them last.
Frequently asked questions
What brushes do I need for acrylic painting as a beginner?
Three synthetic brushes are enough to begin: a wide flat for backgrounds, a mid-sized filbert or round for general shapes, and a small round for details. Learn what those can do before adding specialty shapes such as an angle, a fan or a liner.
Can I use watercolor brushes with acrylic paint?
Synthetic watercolor brushes work with fluid or thinned acrylic, though they are soft and struggle to move thick paint. Avoid using delicate natural-hair brushes, because acrylic is hard on them and any paint that dries near the ferrule can spoil the tip.
What do the numbers on paint brushes mean?
The number indicates size within one maker's range, with higher numbers meaning larger brushes. There is no shared standard, so the same number can be a different width from one range to another. Compare the real width of the tip instead of relying on the number alone.