
Fresh Greens in Under Two Weeks: What You Need to Know
How to grow hydroponic microgreens is simpler than most people expect — and the results are ready to eat in as little as 7 to 14 days.
Here’s the quick version:
- Soak your growing mat (hemp, coco coir, or jute) until damp but not dripping
- Spread seeds evenly across the mat in a thin, dense layer
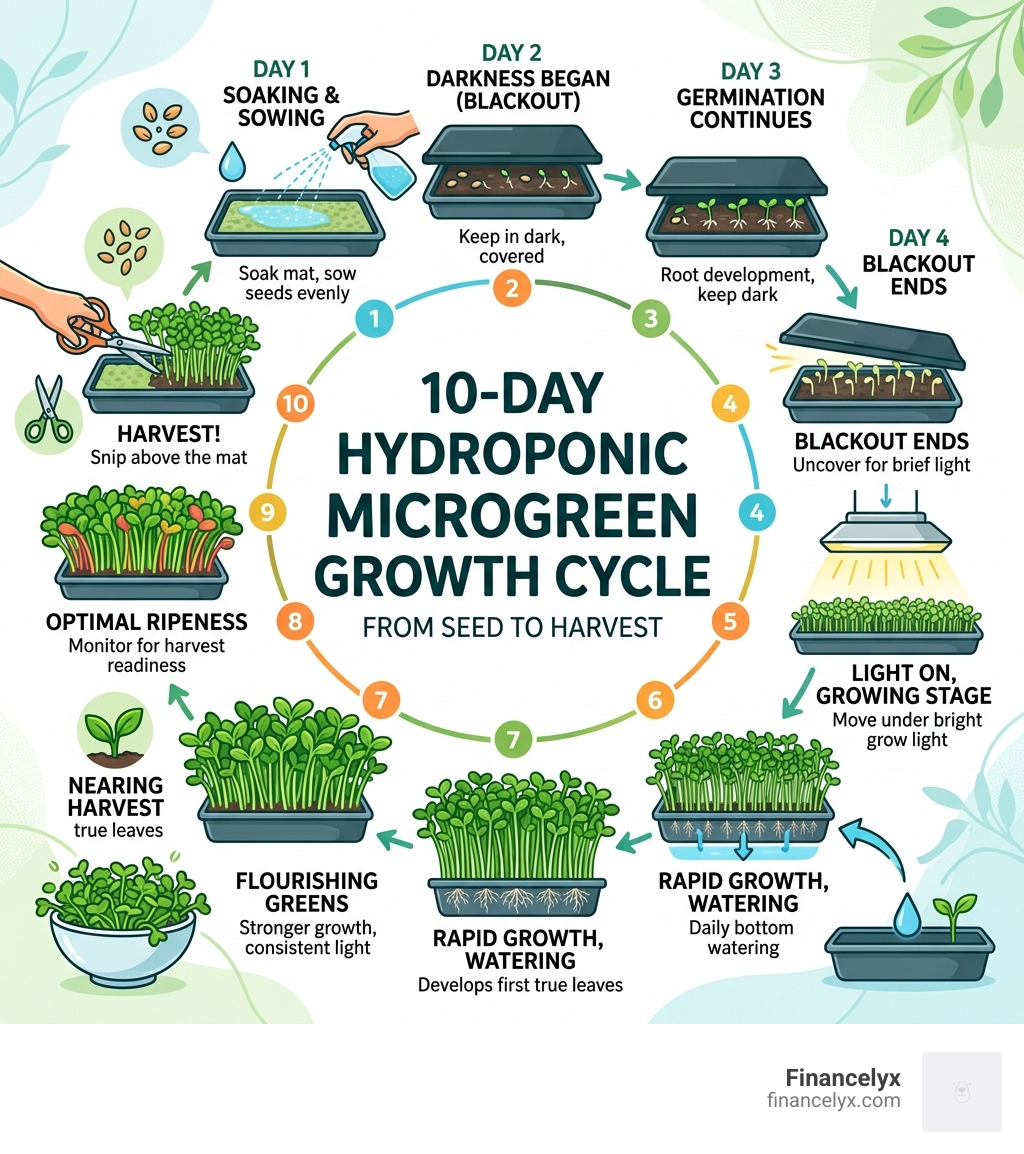
- Cover the tray and keep it dark for 3-4 days (the blackout/germination phase)
- Move it under a grow light for 12-16 hours per day
- Bottom-water daily with plain water or a diluted nutrient solution
- Harvest at 3-4 inches by cutting just above the mat — usually around day 10-14
That’s the whole process. No soil. No garden. No experience needed.
Microgreens are baby vegetable plants harvested just after their first true leaves appear. They’re tiny, but don’t let the size fool you — research suggests they can contain up to 40 times more nutrients by weight than their fully grown counterparts.
The hydroponic method skips soil entirely. Instead, seeds grow on a fiber mat and draw moisture directly from below. The result? Cleaner harvests, faster growth, and far less mess than traditional growing.
For someone with a busy schedule who wants a steady supply of fresh, nutrient-dense food at home, this is one of the easiest wins in the kitchen.
How to grow hydroponic microgreens word roundup:
Why Choose Hydroponics for Microgreens?
If you have ever stared at a $6 clamshell of microgreens at the grocery store and felt a mix of outrage and inspiration, you are in the right place. We believe that everyone should have access to these nutrient powerhouses without breaking the bank. Choosing to learn how to grow hydroponic microgreens is the first step toward food self-sufficiency in even the smallest apartment.
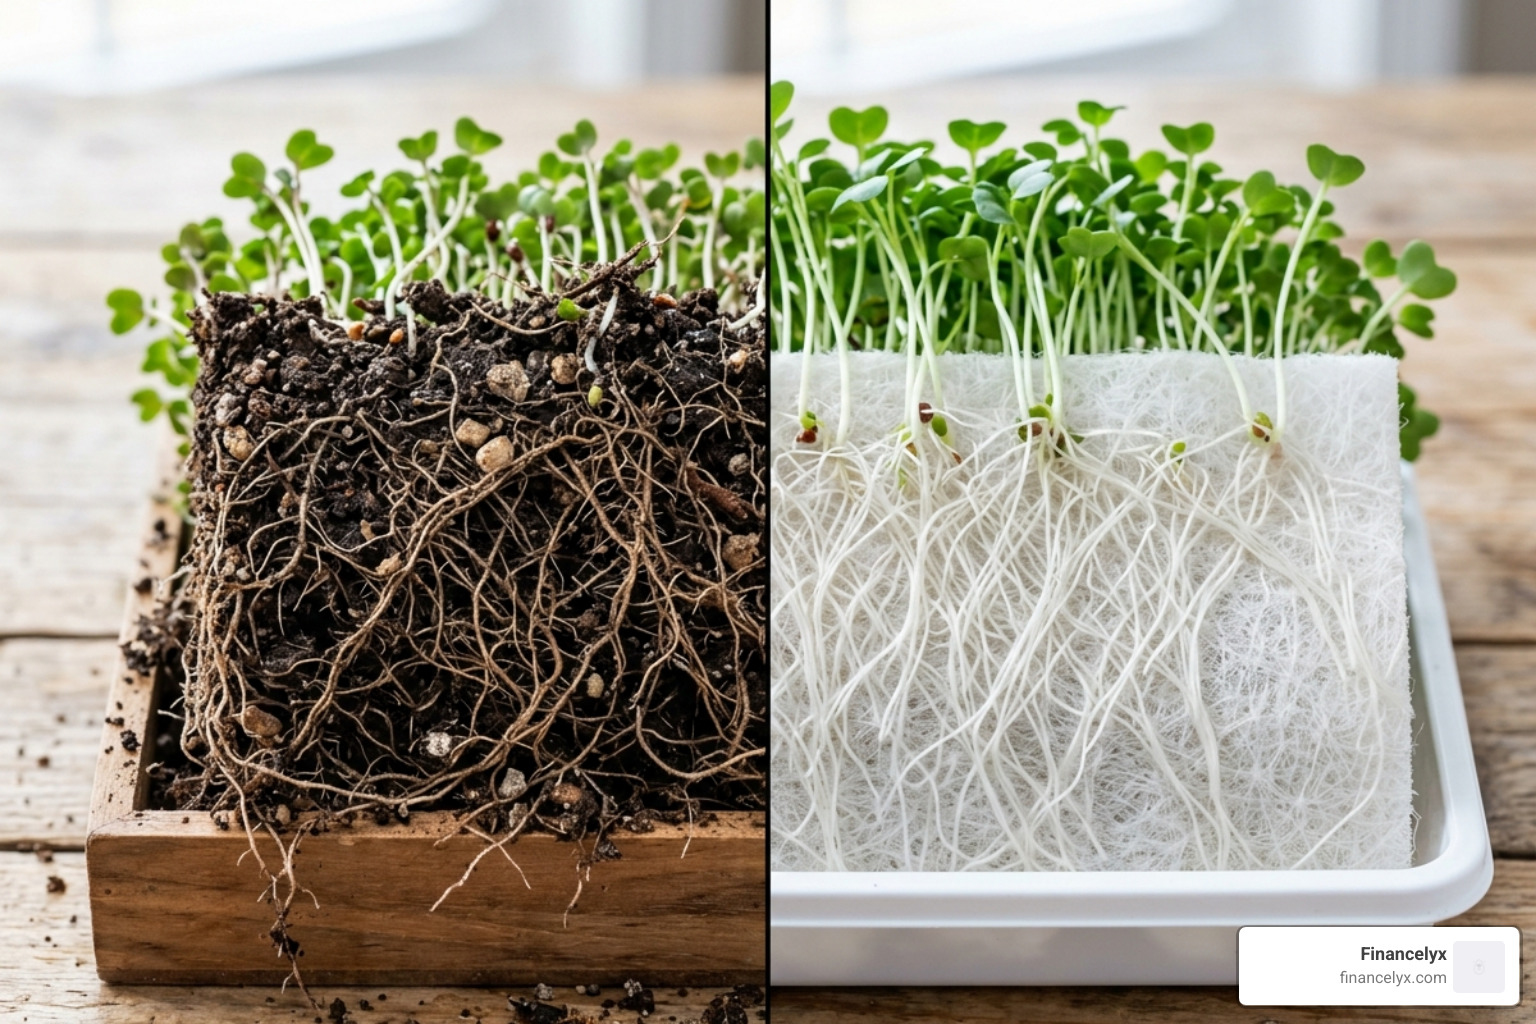
When we grow microgreens hydroponically, we are essentially giving the plants a “VIP pass” to everything they need. Instead of making roots fight through soil particles to find water and minerals, we deliver a nutrient-rich solution directly to them. This leads to several distinct advantages:
- Unmatched Cleanliness: Because there is no soil involved, there is no dirt to wash off your delicate greens. This is a huge win because washing microgreens can actually shorten their shelf life and make them prone to mold.
- Faster Growth Cycles: Hydroponic systems often shave 2 to 3 days off the production timeline compared to soil. When you’re hungry for a fresh salad, every day counts!
- Water Efficiency: These systems use significantly less water than traditional gardening because we can control exactly how much the growing medium absorbs.
- Pest Reduction: Soil is often the hiding place for fungus gnats and other hitchhikers. By going soil-free, we eliminate the primary habitat for many common indoor pests.
| Feature | Soil-Based Production | Hydroponic Production |
|---|---|---|
| Mess Level | High (Dirt/Dust) | Low (Clean Mats) |
| Growth Speed | 10-14 Days | 7-12 Days |
| Risk of Soil-Borne Disease | Moderate | Very Low |
| Harvesting Ease | Requires Careful Cutting | Extremely Easy |
| Sustainability | Medium (Peat/Soil disposal) | High (Compostable mats) |
For a deeper dive into why this method is taking over home kitchens, check out Hydroponic Microgreens: The Ultimate Guide or learn Why Your Microgreens Need A Felt Mat To Thrive to understand the science of root health.
Essential Equipment for Your Hydroponic Setup
Getting started doesn’t require a laboratory or a massive budget. In fact, our toolkit is “embarrassingly simple,” as some of our expert growers like to say. You can set up a productive garden on a kitchen counter or a small shelf.
Here is the essential gear we recommend for your first setup:
- Growing Trays: The industry standard is the 10×20 tray. You’ll need two: one with drainage holes for the plants and one solid tray to act as a reservoir for bottom-watering.
- Grow Lights: While a south-facing window can work in a pinch, full-spectrum LED grow lights are the game-changer for consistency. They ensure your greens don’t get “leggy” (tall and weak) as they stretch for light.
- pH Meters: Microgreens are a bit like Goldilocks—they want their water pH to be just right (between 5.5 and 6.5) to absorb nutrients efficiently.
- Spray Bottle: Essential for the first few days of germination to keep the seeds moist without drowning them.
If you’re ready to build your system today, we’ve put together a guide on How To Set Up Your Own Hydroponic Microgreens System Today to walk you through the assembly.
Selecting the Best Growing Mediums
The “medium” is simply what the roots hold onto instead of soil. In hydroponics, we use inert, often compostable materials. We’ve tested several, and here is our take:
- Hemp Mats: These are a favorite for their sustainability and excellent water retention. They provide a dense, stable surface for seeds to anchor.
- Coco Coir Pads: Made from coconut husks, these are great for larger seeds like sunflowers.
- Jute Fiber: A natural, biodegradable option that is very effective but can sometimes require a bit more soaking upfront.
- Micromats (Wood Fiber): These are often the most cost-effective (around $0.28 per 5×5 tray). They are fragile when wet but perform beautifully for small seeds.
- Biostrate Felt: A specialized synthetic felt designed specifically for hydroponics that manages moisture perfectly.
Discover more about our favorite sustainable choice in The Secret To Lush Microgreens On Hemp Mats.
Best Seeds for Hydroponic Microgreens
Not every seed is a winner in a hydroponic tray, but many of our favorites thrive here. When choosing, always look for non-treated, organic seeds specifically labeled for sprouting or microgreens.
- Radish: The “beginner’s best friend.” They germinate in 24 hours and are ready to eat in a week. They have a spicy, bold flavor.
- Broccoli: A superfood staple. They are very forgiving and grow uniformly.
- Kale & Arugula: Perfect for adding a peppery or earthy punch to your morning smoothies.
- Pea Shoots: These grow tall and sweet. They often need a bit of a weighted cover to help their strong roots push down into the mat.
- Sunflower: These are crunchy and nutty, though they require an 8-12 hour soak before planting to wake them up.
For those looking to maximize health benefits, we highly recommend The Ultimate Guide To Growing Broccoli Microgreens Without Soil.
Step-by-Step: How to Grow Hydroponic Microgreens
Now, let’s get our hands (slightly) wet. The process of how to grow hydroponic microgreens is all about managing the environment to mimic the best parts of nature.
Step 1: Media Saturation Place your chosen mat in the tray with holes. Soak it thoroughly with pH-balanced water. You want it to be like a wrung-out sponge—saturated but not sitting in a pool of standing water.
Step 2: Seeding Density This is where many beginners hesitate. You want to sow densely! For a standard 10×20 tray, we typically use 10 to 15 grams of small seeds (like broccoli) or up to 2 ounces for large seeds (like sunflower). Spread them as evenly as possible, starting from the edges and moving toward the middle.
Step 3: The Initial Mist Once the seeds are down, give them a light misting with your spray bottle. This helps “seat” the seeds against the mat and provides the initial moisture needed to crack the seed coat.
For more technical details on professional methods, check out Hydroponic Microgreens Growing Techniques: Step-by-Step Methods for Success.
Managing the Germination and Blackout Phase
This is the “secret sauce” of professional-looking microgreens. After seeding, we don’t put them under lights immediately. Instead, we enter the Blackout Phase.
We cover the tray with another tray (flipped upside down) or a humidity dome. For varieties like peas and sunflowers, we actually place a weight (like a brick or a heavy book) on top of the covering tray. Why? This mimics the pressure of soil, forcing the seedlings to develop strong, deep roots and helping them shed their seed hulls.
- Duration: Usually 3 to 4 days.
- Check Daily: Peek inside once a day to ensure the mat hasn’t dried out. If it feels dry, give it a quick mist.
- The Big Reveal: Once the seedlings are about 1-2 inches tall and looking a bit pale (don’t worry, they’ll turn green soon!), it’s time to remove the cover and introduce them to the light.
If you’re interested in the more “hardcore” varieties, read Straight Out Of A Cyberpunk Farm Your Guide To Hydroponic Pea Shoots.
Lighting and Nutrients for Hydroponic Microgreens
Once the blackout is over, your tiny greens are ready to photosynthesize.
- Lighting Schedule: We recommend 12 to 16 hours of light per day. Position your LED lights about 6 to 12 inches above the tray. If they are too far away, the plants will get “leggy” as they stretch for the light.
- Nutrient Solution: For the first 5-7 days, the seed has all the energy it needs. However, for longer-cycle crops (10+ days), adding a very dilute hydroponic nutrient solution can boost yield and color.
- The Golden Numbers: Aim for a pH of 5.5 to 6.5 and an Electrical Conductivity (EC) of 0.8 to 1.2 mS/cm. This is much lower than what mature plants need, so be careful not to over-fertilize!
Learn more about feeding your plants in Choosing The Best Microgreen Fertilizer For Soil And Hydroponics.
Harvesting and Storing Your Homegrown Greens
The moment of truth! Most microgreens are ready when they are 3 to 4 inches tall and have developed their first set of true leaves (the ones that appear after the initial “seed leaves” or cotyledons).
How to Harvest: Use sharp, sanitized kitchen scissors or a dedicated harvesting knife. Hold a clump of greens gently and cut about a quarter-inch above the growing mat. We aim for a clean cut to avoid tearing the stems, which can lead to faster wilting.
Storing for Success:
- Don’t Wash Yet: Only wash your microgreens right before you eat them. Moisture is the enemy of shelf life.
- The Paper Towel Trick: Place your harvested greens in an airtight container or a glass jar with a dry paper towel. The towel absorbs any excess moisture.
- Cold is Key: Store them in the refrigerator at 34-40°F. Properly stored, they can last 10 to 14 days, though they are tastiest when eaten immediately!
For more tips on maximizing your harvest, see Growing Microgreens Hydroponically at Home: The Complete Guide.
Troubleshooting Common Growing Mistakes
Even the best of us run into hiccups. Here is how we handle the most common issues:
- Damping-Off (Mold): If you see a patch of fuzzy white mold that smells musty, it’s likely due to poor airflow or overwatering. Tip: Increase ventilation with a small fan and try bottom-watering only.
- Mold vs. Root Hairs: Beginners often panic when they see tiny white fuzz at the base of the stems. If it’s only around the roots and doesn’t smell, those are just root hairs! They are perfectly healthy.
- Algae Growth: If your mat turns green or slimy, it’s getting too much light on the wet surface. Ensure your seed density is high enough to “shade” the mat.
- Yellowing Leaves: This usually means a pH imbalance or a lack of nutrients. Check your water pH first!
Master the art of water management with our guide on Flood And Drain Mastering The Ebb And Flow Setup.
Frequently Asked Questions about Hydroponic Microgreens
Can I grow microgreens in just water?
Yes, you absolutely can! Many short-cycle varieties like radish, broccoli, and mustard contain enough stored energy within the seed to reach harvest height with nothing but plain, pH-balanced water. However, if you are growing “heavier feeders” like pea shoots or sunflowers, or if you want a more vibrant color and higher yield, a very dilute nutrient solution (about 25% of the standard dose) will make a noticeable difference.
Check out The Dirt Cheap Guide To Diy Microgreens for more budget-friendly tips.
How long does it take to grow hydroponic microgreens?
On average, expect a 7 to 14-day window from seeding to harvest.
- Fast Track (7-9 days): Radish, Mustard, Kohlrabi.
- Standard (10-12 days): Broccoli, Kale, Arugula.
- Slow & Steady (14-21 days): Cilantro, Basil, Parsley. Temperature plays a huge role—warmer rooms (70-75°F) will speed things up, while cooler rooms will slow growth.
For a variety-specific timeline, see this How to Grow Hydroponic Microgreens: Easy Guide.
Can I reuse my growing mats or trays?
The trays? Yes, absolutely! Just make sure to sanitize them with a diluted bleach solution or food-grade hydrogen peroxide between crops to prevent pathogen buildup. The mats? Generally, no. Most hydroponic mats (hemp, jute, wood fiber) are designed for single use because the roots become so intertwined with the fibers that it’s impossible to separate them. The good news is that most of these are 100% compostable. Just toss the “spent” mat and roots into your compost bin and start fresh!
Conclusion
At Financelyx, we are passionate about making wellness accessible. Learning how to grow hydroponic microgreens is more than just a gardening hobby; it’s a way to take control of your nutrition. Whether you’re following Elena Monroe’s latest recipe for a “Superfood Micro-Salad” or just looking for a way to add a nutrient-dense crunch to your sandwiches, these tiny greens are the answer.
Growing your own food indoors year-round is a rewarding journey that brings a bit of nature into your home, regardless of the weather outside. It’s clean, it’s fast, and the flavor is incomparable to anything you’ll find in a store.
Ready to take the next step in your indoor farming journey? Explore our guides for beginners and join our community of home growers today!
